Last year I decided I needed to improve my pant-making skills. My sewing has come a long way but fitting pants – especially with woven fabric – still feels really challenging.


I was drawn to the Palisade Pants by Papercut Patterns as soon as the pattern was released. It looked like an easy yet comfortable sew and I love the detail created through the side pockets. I bought the PDF immediately as I couldn’t wait for the physical pattern to arrive!
I’ve since made a few different versions of the pattern. The first pair were made of wool which I’ve had in my stash for ages. I decided to make my pair based on the measurements even though Papercut Patterns sizing is notoriously generous. For me, the sizing of this pattern was spot on. I made a size medium.


I made a few changes to the pattern to adjust the fit. I changed the shape of the front crotch curve to more of a J curve – see image below. I also decided to remove the faux fly – I thought it made the pants look a bit casual. I decreased the height of the front rise by 3cm and the side by 1cm. I’m short waisted and the length in the rise feels very long. I narrowed the waistband to have 3.2cm wide elastic instead of the 5cm in the pattern. I also moved some fabric from the centre back to the side – not sure if this last one makes any difference on fit. I was basing my adjustment on a pant pattern which fits me well.

I love the side pocket of the Palisade pants.

Since making the adjustments above I now have a pattern which fits me perfectly! I have made several versions. The only other difference is that I haven’t topstitched the side panels down. I didn’t like this finish on my test pair.
The pockets on these pants are bulky. It hasn’t bother me but it does bother some people. If you wanted to reduce this bulk I would make the pocket bag from a single layer of fabric. I would finish the top of the inside of the bag with bias binding – rather than a layer of fabric. You could also cut the internal pocket bag in half. The visible fabric would need to be stitched to a lightweight cotton which would reduce the bulk at the bottom of the pocket.


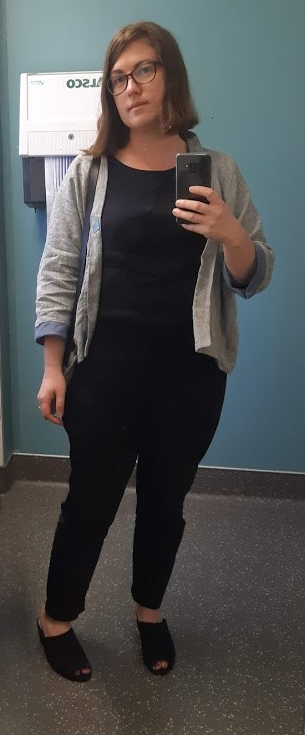
My most recent pair of Palisade’s is made with Renee stretch cotton drill from Drapers Fabrics. I used the reverse side of the fabric as my previous pants in this fabric attracted so much fluff from my cats. The reverse side is much smoother and the cat fur doesn’t stick to it.


I’ve always thought that elasticated waist pants weren’t office appropriate. For me, the mix of elasticised back waistband and the flat front is extremely comfortable especially compared to the pressure of a tight waistband with a zip which digs in.
I love a good tried-and-true pattern and this is one of mine. What’s your favourite pant pattern?
Happy sewing!

These all look awesome Emma. They look good in all types of fabric don’t they?
Did you line your wool ones? I have left over wool fabric and thought I could make pants but they would probably be itchy!
Even though I wasn’t sure about my linen pair I’ve ended up wearing them lots!!
LikeLike
Hi Lynda! Yes they look good in most fabrics. The wool is quite a solid fine weave and wasn’t itchy. After making the tester pair I decided I didn’t like the fabric. Hopefully they found a good home via the op shop.
LikeLike
I’m keen to try the Palisade pattern. I was intrigued that you don’t think elastic waistbands are office appropriate . Surely if you wear a top that covers it nobody knows. I’ve made the Nagoya pants twice now in culotte length. They are great – and a well thought out pattern too. For full length I’ll try the Palisades though as I don’t like wide leg full trousers.
LikeLike
I now think elasticated waists are work appropriate. I sometimes wear tops tucked into pants or skirts. These pants suit a shorter cropped top. I should try the Nagoya next summer they look great!
LikeLike
Hi. I’ve jumped on the Palisade bandwagon! Don’t know how tall you are but did you have to adjust length? The appear to be about 8cm too long for me but there’s no shorten/ lengthen line so I’m not sure where to do my adjustment.
LikeLike
Hi sue I’m 165cm tall. That’s weird there’s no lengthen shorten line! I hope that helps!
LikeLike
Hi Emma,
It seems like we have very similar body shapes: I also need to remove 3cm at the front rise. Did you alter only the “front pant” piece, or did you remove a “wedge” that would go across the front piece and half of the side panel? Congrats on your nice fitting pants and thanks in advance for your help!
LikeLike
Hi Sophie! It’s awesome to find your body double especially when they blog. 😉 From reading the blog and from memory I removed 3cm from the crotch grading to 1cm at the side panels. I allowed more room in the front for my tummy. I had a few weird ripples at the sides which showed those panels were too long. I hope that helps! 💖
LikeLike
Thanks Emma, I’ll give it a try!
LikeLike
You are right about the fitting of present day “bought” pants not being comfortable to many, most seem to be of” hipster ” cut, when you have waist! That’s were your belt should be also there may be poor fit around the back” pockets “. I have tried some 1800s pants from pattern, now I will have a go at jeans, (no builders bum) I hope.
Brian. H
LikeLiked by 1 person